How Do I Add a New Listing

How Do I Add a New Listing V2.3
There are two ways to add a Listing:
• Capture the information and Submit
OR
• Capture the information and do not submit, which will save the Listing as a Draft until you are happy with the information and you activate the Listing.
Either way, the Listing is captured in the same way, however a Draft will be saved but not live on the system feeding to the websites, this will only happen when the Listing is submitted.
To capture the Listing:
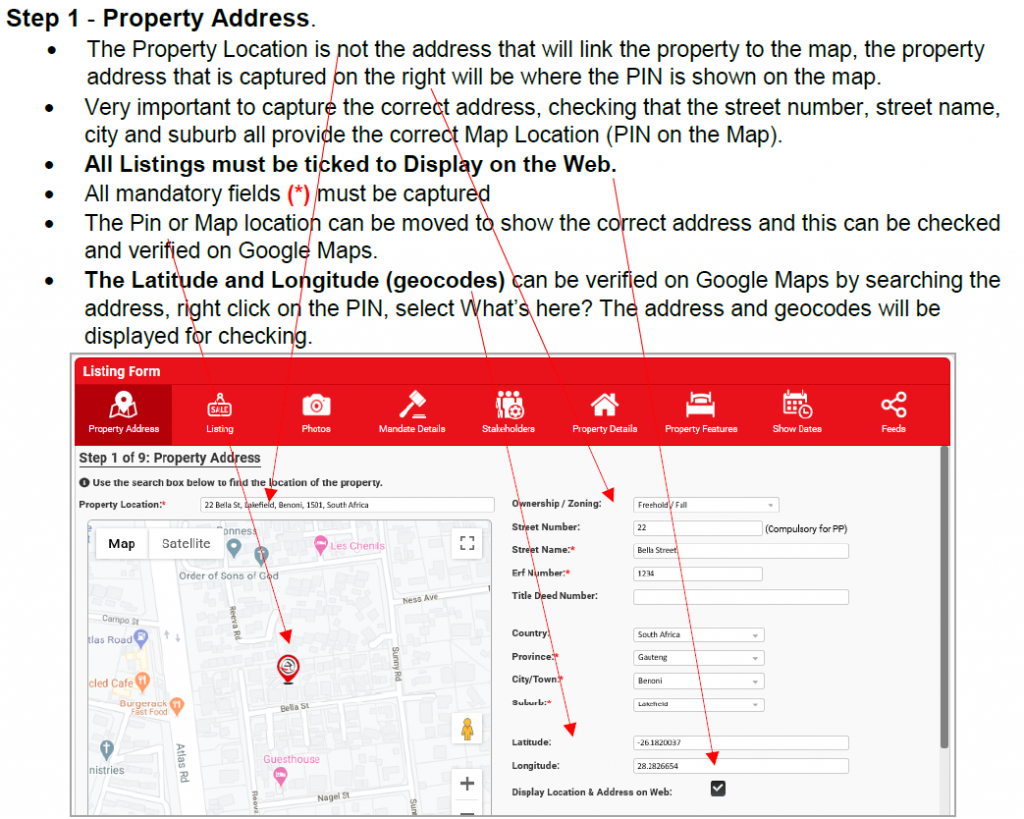
• Click on the Quick Listing button on the top-right hand side of the bar OR click on Listings, on the left, then Create Listing:


Step 2 – Listing Type
• Select listing type

Step 3 – Upload photos of the property (note that screenshots or similar will not upload):
• The best photo of the exterior of the property should be the first photo that you upload and
display in position one
• Important to note that only your best photos of the property should be uploaded. It is not necessary to upload a photo of every angle of a room and don’t upload photos of open toilets or similar that detracts from the property The first 4 – 5 images will appear on your brochure and only the first 30 images will feed to the website.
• Do not rename photos with names that will prevent them from showing on the websites. Renaming should not include special characters like _+&() etc.

Step 4 – Mandate Details:
• Check this information is 100% accurate.
• Make notes under Agent Notes if you are sharing the mandate or if this is possibly a referral from another office
• Price on Request is not a way to withhold information about the price
• Check that your commission is calculated correctly and that any special agreements are noted under Agent Notes on the bottom left of the screen
• All Mandatory fields (*) must be captured.

Step 5 – Stakeholders:
• Click on Add Stakeholder to add the information and remember to SUBMIT the information after completion to add the stakeholder
• The Listing agent will populate automatically
• The seller’s details and any other contact information is crucial for your Listing
• The seller’s details will be withheld for Sole/Exclusive mandates when another agent views the listing
• This information is added to your database and must be captured 100% correct to make the export process easier for your database on CRM.
• All mandatory field (*) must be captured with actual stakeholder’s information

Step 6 – Property Details
• The Property Title is not necessarily the Title that will be displayed on all websites
• The Property Title states maximum 50 characters and this is not for long sentences including number of bedrooms, bathrooms etc. It is a TITLE e.g. “Enjoy the most spectacular view”
• Make sure that all the required information is captured
• Make sure that the description is added in the required paragraph format.
• Note the number of words for each paragraph
• Keep to the minimum number of words for each paragraph and do not capture the full description in paragraph one.
• If you add special characters e.g. exclamation marks !!!!!!!! and other similar characters, your Listing is NOT going to feed to the other websites and could also be rejected by the moderators of P24 and PP
• Special characters do not appear correct on the websites.

Step 7 – Property Features
• Bedrooms and bathrooms must always contain a number
• Add ticks to those features shown so this appears on the websites.
• Add some features in these boxes, even if the description is short.
• These features do not appear the same on all websites.

Step 8 – Show Dates
• If you already have a confirmed date to show the property you can add this information. (Also see HOW TO ADD A SHOW DATE)
• If not, you add a show date later under View/Edit, Step 7 of 11.

Step 9 is the next and last step in the capturing process, DO NOT SUBMIT after your selection was made if you want to retain the Listing as a Draft.
Step 9 – Feeds
• Feeds are those links to the Property.CoZa, Private Property and Property 24 websites.
• A Listing must always be selected to link with our Property.CoZa website.
• Only if a client requests that a Listing should not appear on P24 or PP, should these be left unticked.

PLEASE NOTE: You may activate a feed later by selecting the Listing UNDER DRAFTS from your Listing dashboard and clicking the UPDATE LISTING STATUS button.
DRAFTS:
• If you have created a Draft, click on Drafts on your Listing dashboard, select the Listing that you wish to edit OR activate:

• Click on Load Draft
• The Listing will open for you to make any changes/edits to the Listing.
• Check the Activation Date in step 4 if you are ready to submit.
• Check that you have ticked the Feeds for the Listing to appear on the websites.
• When you are happy with the Listing, you can SUBMIT it.
• If you want to delete a draft, select the Listing and Delete from your list.


