Understanding the LMS listing STATUSES as well as the colours of the portals next to each listing name on the LISTING DASHBOARD v1.3
Understanding the LMS listing STATUSES as well as the colours of the portals next to each listing name on the LISTING DASHBOARD. V1.3
In order to clarify the different STATUSES for listings, as well as the different COLOURS displayed on the portal feed blocks next to the listing name on the LISTINGS DASHBOARD, please see the explanations below:
INACTIVE STATUS:
A listing which is loaded onto LMS (and the photos are uploaded as well), but NO portal feed has been ticked when the listing is SAVED will automatically be loaded as INACTIVE. If a listing has an ACTIVE status but all the portal feeds are later unticked by using the Change Listing Status button which opens the LISTING STATUS & FEED module, the listing status will also be changed to INACTIVE listing status on the LISTING DASHBOARD.
If a listing does have one or more portals ticked when initially SAVING it to LMS, or if any portal names are ticked under the LISTING STATUS & FEED module, but the status has not been changed manually to ACTIVE before saving it, the portal feeds will still show GREY next to the listing name on the LISTING DASHBOARD since the STATUS is not set to ACTIVE and will still reflect as an INACTIVE listing.
Any listing loaded with a listing date set to a future date, the listing will not allow you to change the listing status to ACTIVE, and it will remain as INACTIVE. Once the listing date is reached, LMS will automatically change the listing status to ACTIVE and send the listing to the portals which are ticked at that stage. If no portal/s are ticked, the listing status will remain INACTIVE and the portals will display GREY, irrespective of the fact that the listing is within the listing dates set on LMS.
In other words:
- IF a LISTING is in an INACTIVE STATUS: If a portal is ticked, the portal will display GREY on the LISTING DASHBOARD. To change the portal to GREEN, check that the Listing Activation Date is not set to a future date and change the listing STATUS to ACTIVE on the LISTING STATUS & FEED module. If the Listing Activation Date is set to a future date, change the listing STATUS to ACTIVE in order to activate the Listing Activation Date calendar box, change the activation date to today’s date and click SAVE. The listing will now have an ACTIVE status and the portals which are ticked will display in GREEN.
- IF ACTIVE STATUS is CHOSEN: But NO portal feed has been ticked when the listing was loaded, or by means of opening the LISTING STATUS & FEED module at a later stage, the listing status will revert back to INACTIVE automatically and the portal names will be GREY.
- IF ACTIVE STATUS IS CHOSEN: If the portal name/s ARE ticked, but the listing date is in the future, the listing status will revert back to INACTIVE and the portal names will be GREY next to the listing name. Once the listing date is reached, LMS will make the listing status ACTIVE and send the listing to the ticked portals. The ticked portal name/s will then show GREEN next to the listing name on the LISTING DASHBOARD until the listing date expires (which will change the listing status automatically to EXPIRED and make the portal names GREY on the LISTING DASHBOARD). If the listing status is manually edited under the LISTING STATUS & FEED module to EXPIRED, the listings will no longer be displayed on any portals, irrespective whether they are ticked or not.
EXPIRED STATUS:
A listing will automatically display the EXPIRED STATUS if the listing has passed the expiry date which was set when the listing was loaded onto LMS. A listing with an EXPIRED status, but with one or more portals TICKED, either when the listing was initially loaded or later changed under the LISTING STATUS & FEED module, will display the portal name in BLACK next to the listing name on the LISTING DASHBOARD. If a portal is not ticked while the listing is in EXPIRED status, the portal name will display GREY next to the listing name on the LISTING DASHBOARD.
In other words:
- IF ACTIVE STATUS is CHOSEN: A listing has an ACTIVE listing status and the listing expiry date is reached, the listing status will automatically change to EXPIRED and any portals which were/are ticked will reflect in BLACK next to the listing name on the LISTING DASHBOARD and the listing will NO LONGER be visible on any ticked portals. To give the EXPIRED listing an ACTIVE status again (once expired), open the LISTING STATUS & FEED module, change the status to ACTIVE in order to activate the Listing Activation Date calendar box, change the activation date to today’s date and click SAVE. The listing will now have an ACTIVE status again and the portals which are ticked will display in GREEN.
- IF ACTIVE STATUS is CHOSEN: If a listing has an ACTIVE listing status and the listing expiry date is reached, the listing status will automatically change to EXPIRED and any portals which were/are NOT ticked will reflect in GREY next to the listing name on the LISTING DASHBOARD.
- Listings in an EXPIRED listing status due to the fact that the listing period has passed, or has been set manually to EXPIRED irrespective of the listing period still within range, can be set to the ACTIVE listing status by manually changing the listing status to ACTIVE on the LISTING STATUS & FEED module. The listing status will however only change to ACTIVE if the expiry date is also changed to the future and not to a past date. If this is done correctly, the listing status will change to ACTIVE and any portals ticked will reflect GREEN next to the listing name on the LISTING DASHBOARD.
ACTIVE STATUS: A listing loaded correctly onto LMS, with photos also uploaded correctly and with one or more portals ticked, and with the listing status set to ACTIVE will automatically display the listing status as ACTIVE and the ticked portals as GREEN next to the listing name on the LISTING DASHBOARD. Unticked portals will display the portal name in GREY. To change a listing with an ACTIVE status to EXPIRED status, make use of the LISTING STATUS & FEED module. Click on the STATUS dropdown and choose EXPIRED. Click on SAVE. The listing status will now update to reflect as EXPIRED on the LISTING DASHBOARD and any feeds to any ticked portals will be removed (listing no longer showing on that portal) and will reflect in BLACK.
The ACTIVE listing status have the following sub-statuses:
- Sold. If the listing status is changed to “Sold”, the listing will reflect on our website as “Sold” status for a period of 14 days, where after the listing status will change automatically to “EXPIRED” and will no longer be visible on any websites.
- Let. If the listing status is changed to “Let” (only for To Rent listings), the listing will reflect on our website as “Let” status for a period of 14 days, where after the listing status will change automatically to “EXPIRED” and will no longer be visible on any websites.
- On Offer. If the listing status is changed manually to “On Offer”, the listing status on our website will remain “On Offer” until the expiry date is reached, which will change the listing status to “EXPIRED”, or until the listing status is manually changed by making use of the LISTING STATUS & FEED module by clicking on the Change Listing Status button.
- Reduced. If the listing status is changed manually to “Reduced”, the listing status on our website will remain “Reduced” until the expiry date is reached, which will then automatically change the listing status to “EXPIRED”, or until the listing status is manually changed by making use of the LISTING STATUS & FEED module by clicking on the Change Listing Status button before the EXPIRY DATE has been reached.
NOTE REGARDING LOADING AND EDITING OF LISTINGS:
- All new listings loaded onto LMS must have at least 8 photos uploaded. The system will not allow you to proceed past STEP 6 (photo uploader) if you have not uploaded at least 1 photo. It is however not advisable to only load 1 photo.
- If a listing was already loaded onto LMS (with photos) and has an ACTIVE listing status, but are edited by removing all the photos from the listing in EDIT LISTING MODE, the listing can be saved and the photos will be removed from the portals (if they are ticked), but on the LISTING DASHBOARD the ticked portal next to the listing name will reflect in RED with an error message. This red error message over the portal name is a reminder that there are NO photos loaded for this listing. IT IS NOT ADVISABLE TO HAVE LISTINGS ON THE PORTALS WITHOUT PHOTOS. YOUR LISTINGS WILL BE PENALISED BY SOME OF THE PORTALS IF THEY DO NOT DISPLAY ANY PHOTOS.
BELOW SOME SCREENPRINTS AS FURTHER GUIDANCE:
Click to open the LISTING DASHBOARD.

Click on the ALL STATUS dropdown and choose the applicable listing STATUS in order to only view the listings with the chosen status on your LISTING DASHBOARD. To view your ACTIVE listings, click on ACTIVE. Listing statuses cannot be edited by using this dropdown, only by opening the Change Listing Status section.

Click to View/Edit Listing, but you first have to click on a specific listing (grey background if chosen) from the list on your LISTING DASHBOARD below it. This function is only to VIEW or EDIT a listing’s details or information, but NOT to edit or change the listings STATUS.

Click on Change Listing Status to change the STATUS of a listing, or to tick or untick a specific portal for a specific listing. Once again, first click on a specific listing and then click on this button.

This LISTING STATUS & FEED module will open when you click on the Change Listing Status button:
The following dates are displayed:
- Date Listing Created.
- Activation Date.
- Expiry Date.
If the listing is NOT in ACTIVE listing status, these dates cannot be edited.
In order to change the listing’s STATUS, click on the STATUS dropdown.
In order to edit the Activation or Expiry date, the listing status must first be set to ACTIVE. The Activation and Expiry date blocks and calendar function will now be activated in order for you to edit the dates.
Tick the tick box next to the portal/feed name you wish to activate. To activate all of them, tick the boxes next to all of them. To deactivate, untick the tick box.
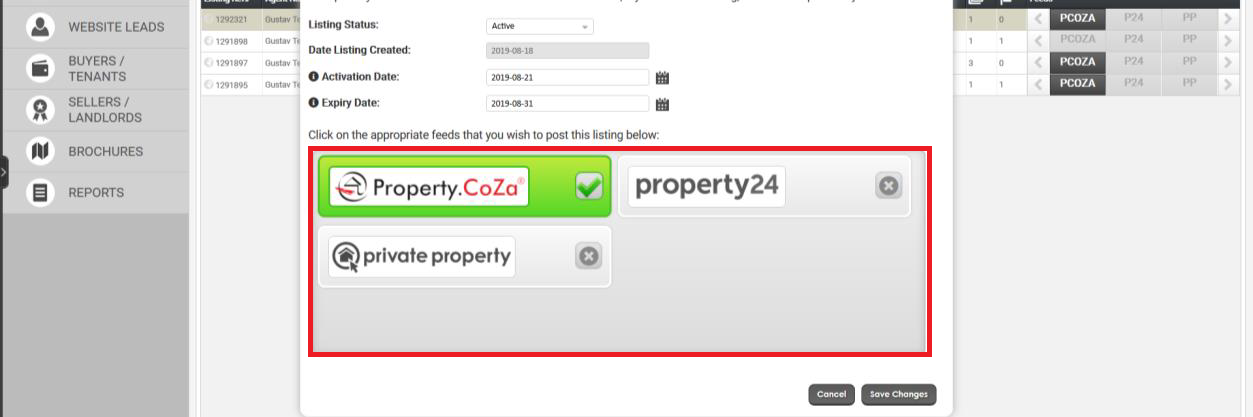
ALWAYS CLICK ON THE “SAVE CHANGES” BUTTON.
LISTING STATUS RESULTS:

Listing STATUSES.
ACTIVE = the listing has an ACTIVE listing status. A listing can only reflect as ACTIVE if 1 or more portals have been ticked earlier and the Activation date is NOT set to a future date.
INACTIVE = the listing has an INACTIVE listing status. A listing reflects as INACTIVE if NO portals have been ticked earlier and/or if the Activation date is set to a future date.
EXPIRED = the listing has an EXPIRED listing status. A listing reflects as EXPIRED if the listing has passed its set EXPIRY date, or if the listing status has been set to “EXPIRED” manually. EXPIRED listings will not reflect on any portals, but can be ACTIVATED by changing the STATUS to ACTIVE and setting the Expiry date to a future date.
REDUCED = the listing has a REDUCED listing status. A listing will remain as REDUCED until the listing Expiry date is reached, or until the status is manually edited to something else.
ON OFFER = the listing has an ON OFFER listing status. A listing will remain as ON OFFER until the listing Expiry date is reached, or until the status is manually edited to something else.
SOLD = the listing has a SOLD listing status. A listing will remain as SOLD for a period of 14 days after which the status will automatically change to EXPIRED by the system and be removed from all portals.
LET = the listing has a LET listing status (rentals only). A listing will remain as LET for a period of 14 days after which the status will automatically change to EXPIRED by the system and be removed from all portals.
PORTAL/FEED/WEBSITE STATUS RESULTS:
Portal name GREEN = successful on the portal. The listing Status must however be ACTIVE in order for the portal name to reflect GREEN.

Listing with ACTIVE listing statuses but with GREY portal boxes means that they have not been ticked in order to be pushed through to that portal. You have to do it manually by opening the LISTING STATUS & FEEDS module by clicking on the listing, then click on Change Listing Status button. Tick the required portal. Save Changes.
Listings loaded WITHOUT any photos will reflect any chosen portals as red with a error message if you hover your cursor over it.

Any other problems with the feed to a particular portal will reflect a RED error message. Follow the advice given in the error, alternatively report the error to SUPPORT together with a listing reference number as well as a screenprint.
Listing in EXPIRED status: If the portal name is in GREY, it means the portal was never ticked when the listing was ACTIVE, and since it has expired, the portal now reflects in GREY.

Listing in INACTIVE status: A listing will always be in an INACTIVE status, with all portal names in GREY if:
- No portal has been ticked,
- The listing date is still in the future. If a portal has been ticked, and the listing date is set to a future date, once the future date arrives, the listing status will automatically change to become ACTIVE and the listing will appear on the portal or portals ticked. That portal will then display GREEN if the update was successful.

To activate the P24 or PP link for a specific listing which currently has an ACTIVE listing status, reflecting GREEN for PROPERTY.COZA but not GREEN for P24 and/or PP, open the LISTING STATUS & FEEDS module by clicking on the Change Listing Status button, tick the box next to Property24 and/or PRIVATE PROPERTY, click on Save Changes. Go to the LISTING DASHBOARD. See if the PROPERTY24 and/or PRIVATE PROPERTY name next to the listing is now GREEN. If it is GREEN, go to the P24 and/or PP website by clicking on the GREEN portal name next to the listing on the LISTING DASHBOARD and see if everything displays correctly. If it is not GREEN, see if there is a red error message. Follow the steps explained in the error message. If you are still unable to resolve the problem, report the error message to SUPPORT with a listing reference number.

In order to open a listing on a portal with ease, simply click on the GREEN portal name next to the listing name on the LISTING DASHBOARD.
The listing will open in a new TAB. Changes or editing done to listings on P24 and PP may take a few hours to reflect. Changes made to listings on our website reflects immediately.
